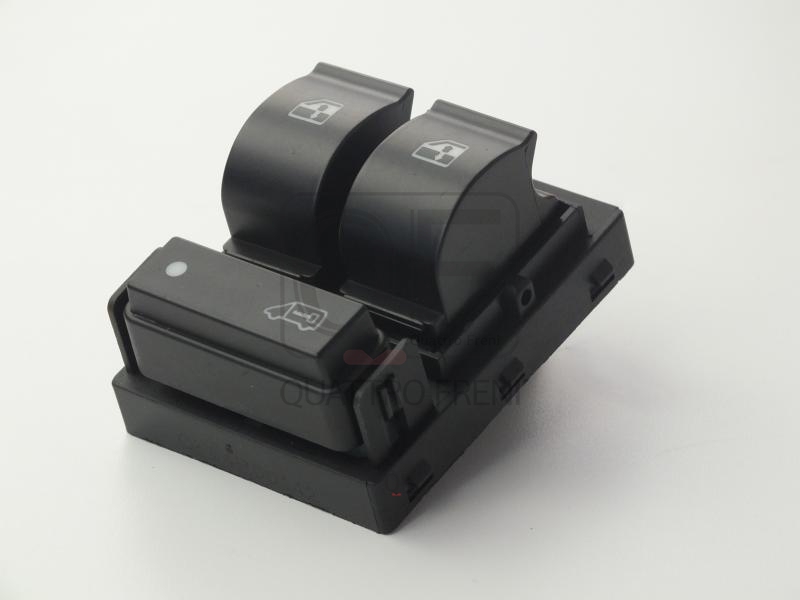
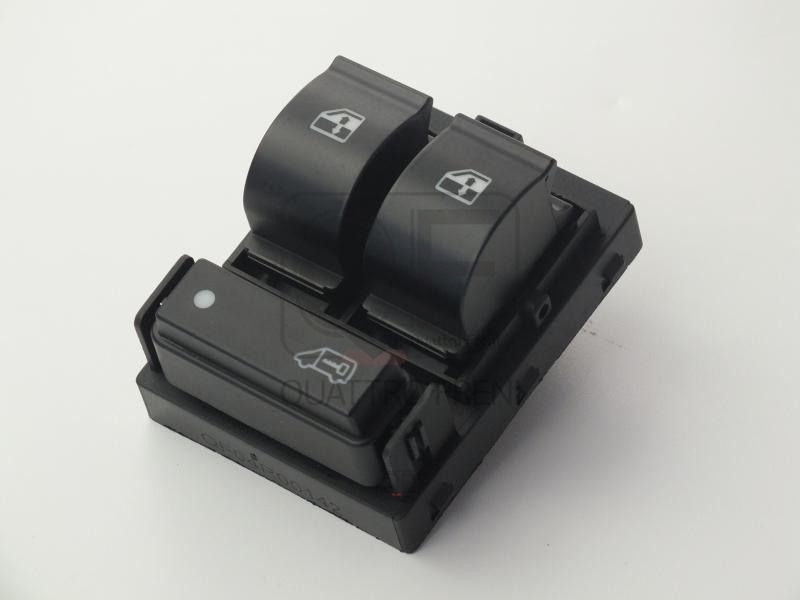
FIAT/ALFA/LANCIA 735487419 WINDOW SWITCH
Product Specifications
| FIAT/ALFA/LANCIA | 735487419 |
| FIAT/ALFA/LANCIA | 735532907 |
| FIAT/ALFA/LANCIA | 735532909 |
| FIAT/ALFA/LANCIA | 735532908 |
| FIAT/ALFA/LANCIA | 735532903 |
| FIAT/ALFA/LANCIA | 735532904 |
| FIAT/ALFA/LANCIA | 735532905 |
| FIAT/ALFA/LANCIA | 735421713 |
| FIAT/ALFA/LANCIA | 0000735487419 |
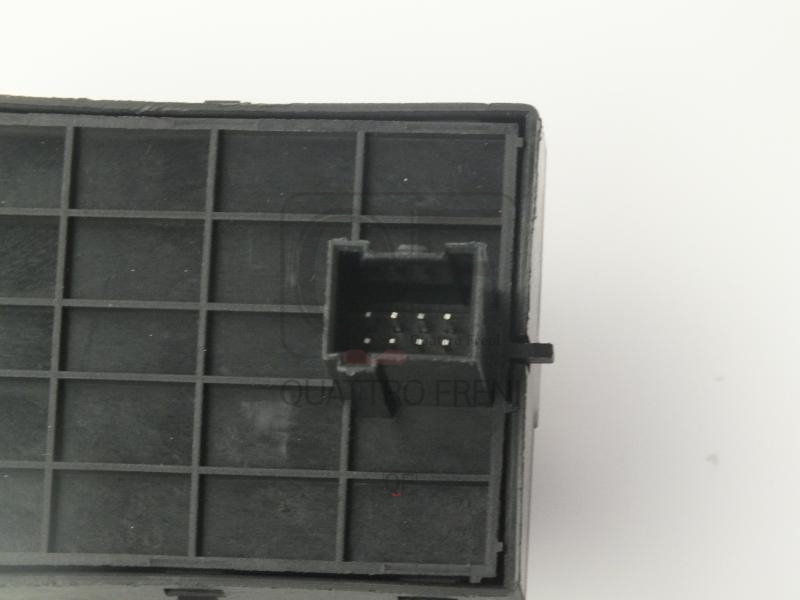
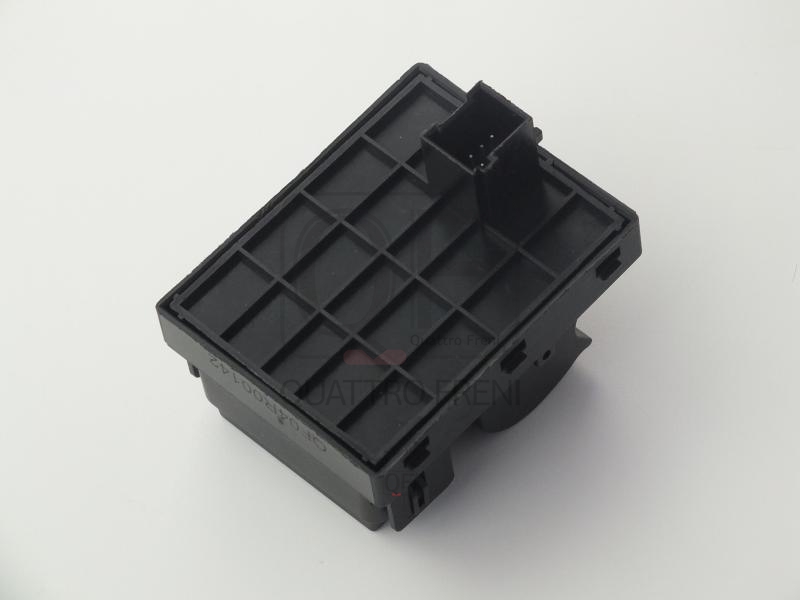
The WINDOW SWITCH is an individual door-mounted power window switch — a single-channel rocker or push-button switch installed in the door card armrest of a passenger or rear door that allows the occupant of that door to raise or lower the window glass independently without operating the driver's master switch panel. The switch contains a pair of normally-open contacts arranged so that pressing the switch in the up direction completes the circuit to the window motor's raise input while pressing in the down direction reverses polarity to the motor's lower input, driving the motor in the opposite direction; releasing the switch in either direction opens both contact sets and the motor stops. On vehicles with window control modules the switch outputs a digital signal to the BCM or window ECU rather than directly switching the motor supply current, allowing the module to apply end-stop detection, anti-trap reversal, and one-touch functionality to the individual door; on simpler relay-based systems the switch directly switches the motor supply at full current through its contacts, making contact quality critical for reliable operation. The individual door switch operates only when the driver's master panel child lock is not active — when child lock is engaged the door switch circuit is interrupted at the master panel, routing all window control for that door exclusively through the driver's master switch regardless of the individual switch position.
This unit — FIAT/ALFA/LANCIA 735487419 — is manufactured to OEM-equivalent specifications: switch contact material and rated current, rocker or push-button travel and actuation force, housing dimensions and door card mounting clip geometry, connector pinout, illumination LED specification where applicable, and child lock circuit interrupt compliance are matched to the original part. Supplied as a direct plug-and-play replacement for standard fitment. Available wholesale from 1.76 USD, MOQ 100 pcs, production lead time 29 days.
Individual window switches fail through contact oxidation from the moisture-rich door interior environment — particularly on rear door switches that are operated infrequently and whose contacts develop oxide films between uses that prevent current flow on a light touch; through mechanical wear of the rocker pivot at high-cycle-count positions; and through connector pin corrosion from water ingress through the door membrane. The most reliable diagnostic step before replacing an individual switch is to confirm whether the window responds correctly when operated from the driver's master panel — if the window operates from the master panel but not from the individual switch, the fault is definitively in the individual switch circuit rather than the motor or regulator.
- Confirm the window operates correctly from the driver's master panel before removing the door card — this single test takes 10 seconds and definitively confirms whether the fault is in the individual switch circuit or in the window motor and regulator; if the window does not respond from the master panel either, the fault is in the motor, regulator, or wiring harness — not the individual switch; replacing the switch without this test risks unnecessary door card removal on a misdiagnosed fault.
- Disconnect the negative battery terminal before removing the door card on doors with airbag side curtain or door-mounted airbag systems — some vehicles deploy side airbags from modules located in the door card lower section; inadvertent contact with the airbag connector during door card removal on a live system can trigger deployment; disconnect the battery and observe the SRS discharge wait time specified by the OEM before working inside any door with SRS components.
- Release the switch from the door card using a trim clip removal tool inserted into the switch bezel gap — most individual door switches are retained by two or three snap-fit clips accessible from behind the switch in the door card cavity; release the clips with a flat trim tool pressed against each clip tab through the door card cavity; never use a screwdriver on the switch face — this cracks the rocker surface and damages the visible switch edge that the occupant touches.
- Inspect the wiring connector for pin corrosion and broken locking tab before connecting to the new switch — the most common cause of individual window switch failure is not the switch itself but connector pin corrosion from moisture in the door cavity; if the connector pins show green corrosion or the locking tab is broken, clean with electrical contact cleaner or replace the connector; a corroded connector fitted to a new switch will produce the same contact resistance fault within a short operating period.
- Confirm the new switch is correctly specified for the door position — front passenger and rear door window switches differ on many vehicles not only in their labelling but in their connector pinout and contact configuration; fitting a switch specified for a different door position may produce reversed operation direction or no operation at all even though the switch appears physically identical.
- Install the new WINDOW SWITCH (FIAT/ALFA/LANCIA 735487419), reconnect the connector until it clicks, refit the door card, reconnect the battery, and test window operation in both raise and lower directions from the individual switch; confirm the child lock function correctly disables the switch when activated from the master panel; verify switch illumination if applicable before returning the vehicle to service.
| Part | Reason for Combined Replacement |
|---|---|
| Window Regulator Motor OEM ref. varies by door position | A window regulator motor that draws abnormally high current from a seized regulator mechanism can destroy individual switch contacts through sustained current overload in relay-based window systems where the switch directly carries the motor supply current. Before fitting a new switch, measure the motor current draw with a clamp ammeter — a motor drawing above its rated current requires replacement simultaneously with the switch to prevent the new switch contacts from being burned out by the same overload condition. |
| Door Wiring Harness Connector Application-specific sealed connector | The wiring connector at the individual door switch is exposed to the door cavity's humidity and temperature cycling and develops pin corrosion at a rate determined by how well the door membrane seals water from the cavity. A connector with corroded pins produces the same intermittent contact resistance fault as a failed switch — and a corroded connector fitted to a new switch will produce the same fault within a short period. Replace the connector if any pin corrosion is found during switch replacement. |
| Window Master Switch Panel Driver's door master control panel | On vehicles where the individual door switch has failed from contact oxidation, the driver's master switch panel — which handles a significantly higher cycle count for the same window — may be at or near the same contact wear threshold. Inspect the master panel's contacts for the window position served by the failed individual switch; if the master panel shows any hesitation or increased resistance on that window position, replacing both simultaneously during the same door card removal session avoids a repeat visit for the master panel within a short interval. |